开始项目
在开始之前
确保自己的系统为 Windows 10 专业版

如果是 家庭中文版 请参考 系统安装 重装系统。
然后可以参考 配置舒适的桌面环境 。
本地安装 Git
前往 Git 官网 下载安装包,下一步到底。
配置 Git
桌面右键点击 [Git Bash Here],输入以下指令:
# "username" 为 GitHub 账号,用户名
git config --global user.name "username"

# xxxxxxxxxx@mail.com 为 GitHub 账号,注册时的用的邮箱
git config --global user.email xxxxxxxxxx@mail.com
生成自己的 SSH Key
Git Bash 终端中,输入 ssh-keygen
$ ssh-keygen
Generating public/private rsa key pair.
Enter file in which to save the key (/c/Users/Yue_p/.ssh/id_rsa): # 直接回车
Enter passphrase (empty for no passphrase):    # 直接回车
Enter same passphrase again:                   # 直接回车
Your identification has been saved in yes
Your public key has been saved in yes.pub
The key fingerprint is:
SHA256:xuvPaGeJuufX6k4oiufALDHD7PCfZxkfXQxjCBElkCA Yue_p@DESKTOP-SQLFD1T
The key's randomart image is:
+---[RSA 3072]----+
|E ...o==..       |
| .  .  .. +      |
|         . +     |
|o      .    o    |
|=o      S. .     |
|oB    ...o.      |
|..=   .+oo.o     |
| . +.o+o=+= .    |
|  .o=oo*+B*.     |
+----[SHA256]-----+
现在,<个人文件夹>/.ssh/ 中应该有 id_rsa(私钥)与 id_rsa.pub(公钥)两个文件。
注册 GitHub/Gitee 账号
前往全球最大的同性交友网站面向开源及私有软件项目的托管平台 GitHub 注册并登入账号。
前往全国最大的同性交友网站云端软件开发协作平台 Gitee 注册并登入账号。
前往本项目:
- GitHub 地址 https://github.com/Yue-plus/NetNote,点击 Watch、Star、Fork。
- Gitee 地址 https://gitee.com/yue_plus/NetNote,点击 Watch、Star、Fork。
添加 SSH Key
用 记事本打开 <个人文件夹>/.ssh/id_rsa.pub 文件。
GitHub
打开 GitHub.com 参照以下截图添加 SSH Key:
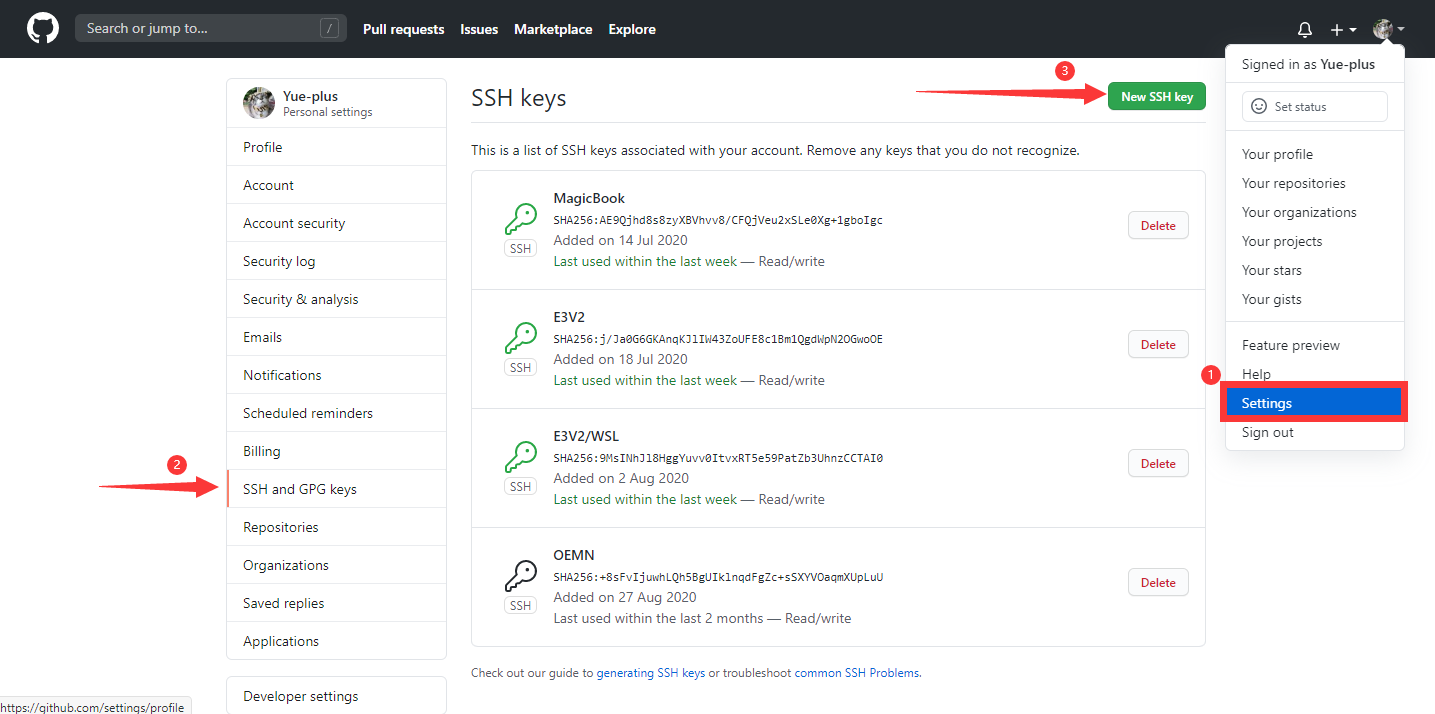
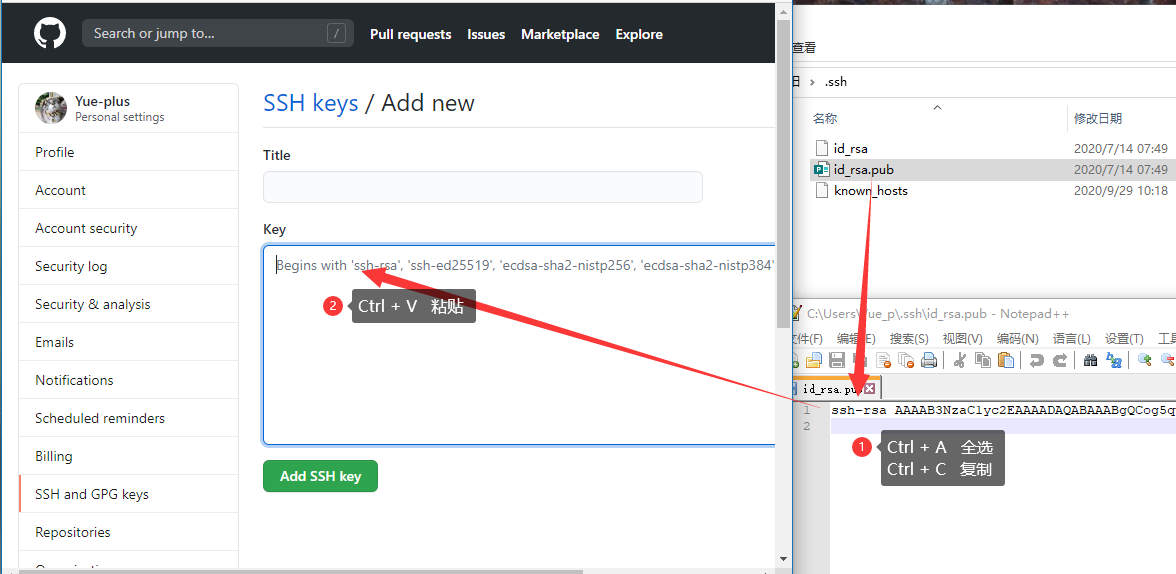
最后点击 [Add SSH Key]
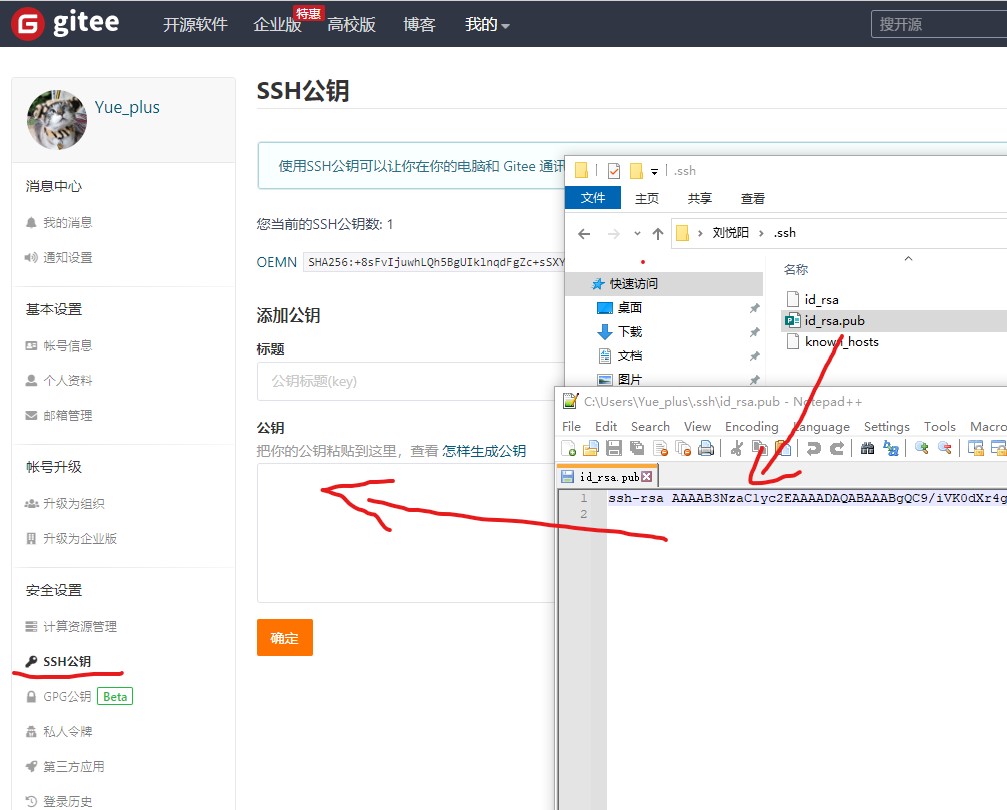
Gitee
打开 设置 -> SSH 公钥
本地安装 NodeJS
前往 NodeJS 官网 下载安装包,下一步到底。
安装 cnpm
由于国内众所周知的网络原因,推荐安装 cnpm,在安装依赖时代替 npm 命令:
npm install -g cnpm --registry=https://registry.npmmirror.com
安装后可使用 cnpm -v 验证:
$ cnpm -v
cnpm@7.0.0 (C:\Users\Yue_p\AppData\Roaming\npm\node_modules\cnpm\lib\parse_argv.js)
npm@6.14.15 (C:\Users\Yue_p\AppData\Roaming\npm\node_modules\cnpm\node_modules\npm\lib\npm.js)
node@16.8.0 (C:\Program Files\nodejs\node.exe)
npminstall@5.0.2 (C:\Users\Yue_p\AppData\Roaming\npm\node_modules\cnpm\node_modules\npminstall\lib\index.js)
prefix=C:\Users\Yue_p\AppData\Roaming\npm
win32 x64 10.0.19043
registry=https://registry.nlark.com
本地安装 Yarn
可参考 Yarn 官网。
在 本地安装 NodeJS 后,在终端输入:
npm install -g yarn
可使用 yarn -v 验证安装,如果输出版本号则安装成功。
安装 tyarn
由于国内众所周知的网络原因,推荐安装 tyarn,在安装依赖时代替 yarn 命令:
npm install yarn tyarn -g
拉取项目
找一个合适的路径,执行以下指令:
# GitHub 克隆仓库(注意替换为自己的用户名:<username>)
git clone git@github.com:<username>/NetNote.git

# Gitee 克隆仓库(注意替换为自己的用户名:<username>)
git clone git@gitee.com:<username>/NetNote.git

cd NetNote

# 安装依赖
yarn
运行项目
在项目路径下执行:
yarn docs:dev
通过浏览器访问:http://127.0.0.1:8080/
更多配置可参考 VuePress2 介绍
参与项目
本项目使用了 VuePress2 静态网站生成器,参考 项目目录结构 使用 Markdown 语法 来编写/修改 .md 文件。
新建页面请参考 默认主题配置 修改项目内的 /docs/.vuepress/config.ts 文件。
当前计划任务:
- 网络搭建
- 系统服务
- 云平台与虚拟机
- Windows Server
- Linux
部署项目
复制 deploy.sh.examples 文件,并重命名为 deploy.sh 并适当修改 <USERNAME>/<REPO>。
附:项目目录结构
当前所有文档都保存在 NetNote\docs\ 文件夹内。
新建目录需修改 NetNote\docs\.vuepress\config.ts 文件。
公共图片统一放在 NetNote\docs\.vuepress\public\img 文件夹内。
每个文档都可以放在独立的文件夹下,维护自己的 img 文件夹。
目录结构
卷序列号为 6010-F505
D:.
├─.vuepress/
├─coding
│  ├─Docker/
│  ├─Java
│  │  ├─Gradle/
│  ├─MariaDB/
│  ├─PostgreSQL/
│  ├─Python/
│  ├─RabbitMQ/
│  ├─Redis/
│  ├─Spring
│  │  └─Framework
│  │      └─WebServlet/
│  └─Web/
├─game/
├─hack
│  └─base/
├─net
│  ├─00-Abbreviation/
│  ├─01-base/
│  ├─acap/
│  ├─manual
│  │  ├─command/
│  │  └─operate/
│  ├─router/
│  ├─security/
│  ├─switch/
│  └─wan/
├─serve
│  ├─base
│  │  ├─sys_config/
│  │  └─sys_install/
│  ├─CentOS
│  │  ├─Apache/
│  │  ├─Base/
│  │  ├─CA/
│  │  ├─Chrony/
│  │  ├─E-Mail/
│  │  ├─firewalld/
│  │  ├─MariaDB/
│  │  ├─NFS/
│  │  ├─NIS/
│  │  ├─Pacemaker/
│  │  ├─Samba/
│  │  ├─Tomcat/
│  │  └─Unbound/
│  ├─VM
│  │  ├─DCC-CRL1000/
│  │  ├─Hyper-V/
│  │  ├─VirtualBox/
│  │  └─VMware/
│  └─WS
│      ├─AD-CS/
│      ├─AD-DS/
│      ├─AD-RMS/
│      ├─CommonRequirements/
│      ├─DFS/
│      ├─DNS/
│      ├─FailoverCluster/
│      ├─FS/
│      ├─IIS/
│      ├─iSCSI/
│      ├─MPIO/
│      ├─NLB/
│      ├─PS/
│      └─WDS/
└─start
    ├─img
    ├─use_GitHub/
    ├─use_IDEA/
    └─use_VScode/
附:终端设置代理
Git Bash
设置代理
# http
git config --global http.proxy http://127.0.0.1:1080
git config --global https.proxy https://127.0.0.1:1080

# socks5
git config --global http.proxy 'socks5://127.0.0.1:1080'
git config --global https.proxy 'socks5://127.0.0.1:1080'
取消代理
git config --global --unset http.proxy
git config --global --unset https.proxy
PowerShell
设置代理
netsh winhttp set proxy 127.0.0.1:1080
取消代理
netsh winhttp reset proxy
查看代理
netsh winhttp show proxy
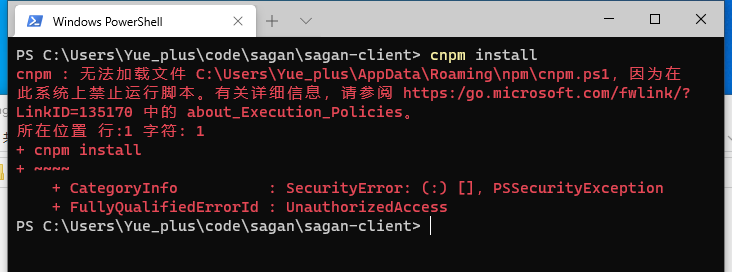
附:Windows PowerShell 无法加载文件,因为在此系统上禁止运行脚本。
cnpm : 无法加载文件 C:\Users\Yue_plus\AppData\Roaming\npm\cnpm.ps1,因为在此系统上禁止运脚本。
有关详细信息,请参阅 https:/go.microsoft.com/fwlink/?LinkID=135170 中的 about_Execution_Policies。
所在位置 行:1 字符: 1
+ cnpm install
+ ~~~~
    + CategoryInfo          : SecurityError: (:) [],PSSecurityException
    + FullyQualifiedErrorId : UnauthorizedAccess
参阅 https:/go.microsoft.com/fwlink/?LinkID=135170
解决方法:
先以 管理员身份 在 PowerShell 中运行一下指令:
set-ExecutionPolicy RemoteSigned
然后就不会报错了。
附:没有 telnet 指令
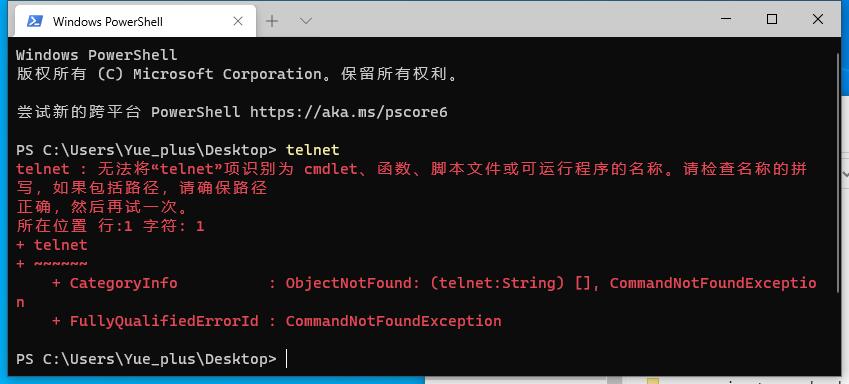
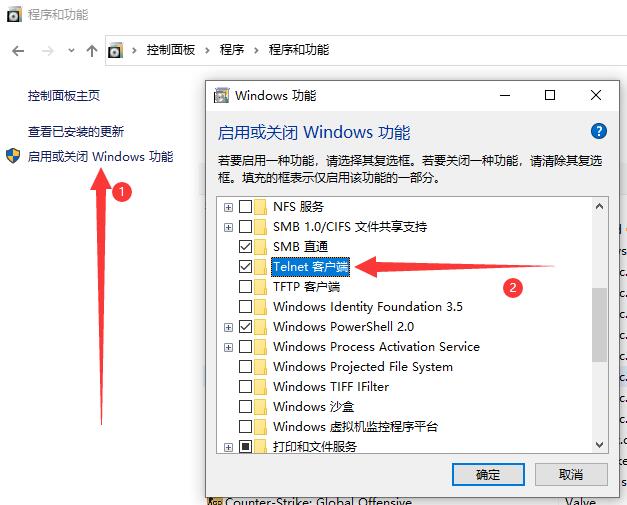
Windows 10
在 控制面版 -> 程序 -> 程序和功能 -> 启用或关闭 Windows 功能 中,勾选 Telnet 客户端:
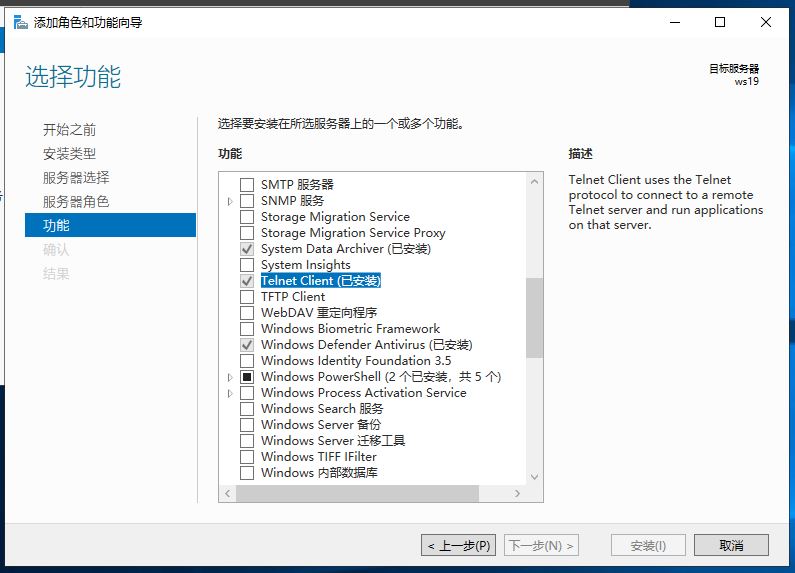
Windows Server
在 服务器管理器 -> 添加角色和功能 中,添加 Telnet Client 功能:
telnet 指令帮助
telnet [-a][-e escape char][-f log file][-l user][-t term][host [port]]
 -a      企图自动登录。除了用当前已登陆的用户名以外,与 -l 选项相同。
 -e      跳过字符来进入 telnet 客户端提示。
 -f      客户端登录的文件名
 -l      指定远程系统上登录用的用户名。
         要求远程系统支持 TELNET ENVIRON 选项。
 -t      指定终端类型。
         支持的终端类型仅是: vt100, vt52, ansi 和 vtnt。
 host    指定要连接的远程计算机的主机名或 IP 地址。
 port    指定端口号或服务名。
附:打不开微软商店 / 无法系统登入微软账号
打不开微软商店可以试试将 DNS 设为 4.2.2.1 和 4.2.2.2